1
Support / Tutorial: How edit Telemetry overlay with Adobe Premiere
« on: January 14, 2015, 03:33:31 PM »
Hello my sunday driver, Today i'm going to explain how sync the telemetry overlay graphics and the onboard camera using the video editing software Adobe Premiere CS5 / CS6 / CS7 / CC (CS4 NO COMPATIBLE)
First off we need to acces to the config are in our session through the 'wrench icon'

At the very bottom we find the download overlay table which is divided into different stints, be careful to choose the right one

I personally prefer (even if it is slower) to generate and download each of the graphs individually (in this case, speedometer, map and g-meter) so this way i can manage each element in the right places, if we choose to generate all graphics at once, we will get a video with all "welded" with no chance of adjustment
For this example, i'm going to download just the speedo and the map and leave the g-meter, the phone was inside pocket and that make to the accelerometer to get wrong / weird values so not worth to include in the video
The generated =16pxfiles are compressed files ZIP format, we will find as many SWF (flash video) files as laps we did for that stint, the file name reflects the lap to wich it belong.
Before start to work with Premiere, its recommended to create a folder with the video onboard, al telemetry videos uncompressed and others stuff like logos, music, cover images....

For this example I'm going to use Premiere CS7 also know as Premiere CC , anyway this tutorial is likewise valid for previus versions as there are few changes regarding option that are going to use, lets go!
=39pxGENTLEMEN START YOUR ENGINES
So start premiere, Create New Project, set a name and then create a sequence with the video parameters, conmmonly 1920x1080 , 30 fps


Once we have created the sequence, we need to import all the files, right click -> Import

After drag the video onboard to channel 1 ( This way we left chan 2 and 3 free to the telemetry) it's time to sync the telemetry with the video onboard, This involves to place the video at the exact moment when we cross the start/finish line, In the example video, the line it's far away (left image) so i need to move forward as far as i think (right image)

So now we are over (or near) the line and we need to drag to channel 2 the first lap (SPEED_L1) of the speedometer just in that place, press the play button and carefully look the sync, we need to look just to the speedometer needle and the sound to get an idea if telemetry is going ahead or delayed, in some low-end computers the preview may not work smoothly and can be hard to sync due to slowdowns and freezes, we can solve this changing the image quality to "1/4" using the dropdown indicated in the image, if you still getting bad performance you can disconnect the image of the video onboard pressing the "eye" icon indicated in the very bottom of the image, this will boost the preview speed and will be enough to sync sound and telemetry

When you move the telemetry (purple bar in the image) a box appears showing how many frames you are moving forward or backward, anyway we will reach a point where we need to need more accuracy and make smaaaalll movements to synchronize perfectly both channales, to increase the accuracy and make smallest movements we should decrease the zoom bar at the very bottom of the image, in this animation example we can view how goes from 19 frames movements to 1 frame movement

Once we get audio and telemetry synchronized, we just need to pu the following giles one after the other, where finishes the first lap , beginns the second lap and so on, also we should to do the same process for the map (MAP_L1, MAP_L2...) so our timeline should look like that:
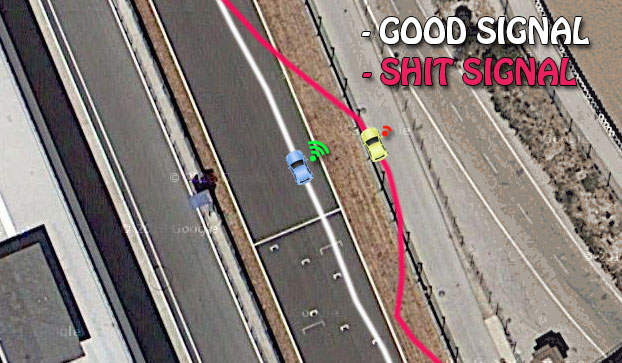
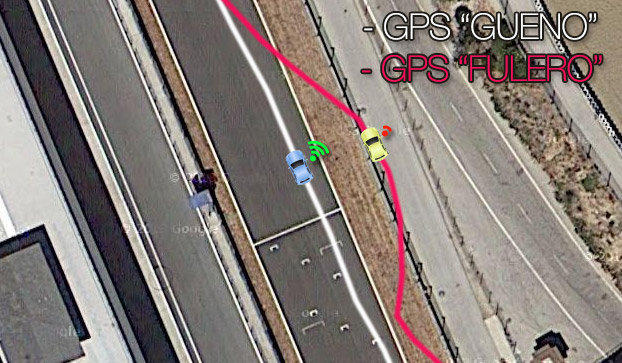
Note: it's possible that some lap remains not completely synchronized due some reasons like poor gps signal, video camera failure or frame drop, in another tutorial i wil try to explain how to solve this kind of mismatches

Obviusly we will not let the graphics in the center of the image, need to move and resize both, in this example i'm going to click over the purple bar SPEED_L9, at the left of the screen i get a set of controls that will affect to this clip, deploying the motion tab we access to the size and position settings, just have to put a number with the keyboard or modify with the mouse, pretty easy

Once we have the graphic in the right place, we press right click over motion tab and then Copy , then we will go clip to clip (SPEED_L1, SPEED_L2, SPEED_L3...) pasting the setting, that way all graphics we will be equal, to paste settings we need to right click at an empty zone and press Paste , the speedometer will take the posotion and the size right away

Last 2 steps are needed to the MAP graphic aswell (and also to a G-METER if we are using that graphic too) in the same line , we should to move the map to the desired position and size, copy settings and the paste to the others clips (MAP_L1,MAP_L2... )
To export the final edit we need to go to the Render Area
File -> Export -> Media
If target its Youtube, at format whe should choose H.264 and set the Preset to YouTube HD 1080p 29.97fps, this preset will ruin a lot the quality video but that it's the maximum quality that youtube accept at the moment, if you want to keep this video in your hard drive aswell i recommend you to make an aditional render with high quality settings like HD 1080 28.97fps preset
First off we need to acces to the config are in our session through the 'wrench icon'
At the very bottom we find the download overlay table which is divided into different stints, be careful to choose the right one
I personally prefer (even if it is slower) to generate and download each of the graphs individually (in this case, speedometer, map and g-meter) so this way i can manage each element in the right places, if we choose to generate all graphics at once, we will get a video with all "welded" with no chance of adjustment
For this example, i'm going to download just the speedo and the map and leave the g-meter, the phone was inside pocket and that make to the accelerometer to get wrong / weird values so not worth to include in the video
The generated =16pxfiles are compressed files ZIP format, we will find as many SWF (flash video) files as laps we did for that stint, the file name reflects the lap to wich it belong.
Before start to work with Premiere, its recommended to create a folder with the video onboard, al telemetry videos uncompressed and others stuff like logos, music, cover images....
For this example I'm going to use Premiere CS7 also know as Premiere CC , anyway this tutorial is likewise valid for previus versions as there are few changes regarding option that are going to use, lets go!
=39pxGENTLEMEN START YOUR ENGINES
So start premiere, Create New Project, set a name and then create a sequence with the video parameters, conmmonly 1920x1080 , 30 fps
Once we have created the sequence, we need to import all the files, right click -> Import
After drag the video onboard to channel 1 ( This way we left chan 2 and 3 free to the telemetry) it's time to sync the telemetry with the video onboard, This involves to place the video at the exact moment when we cross the start/finish line, In the example video, the line it's far away (left image) so i need to move forward as far as i think (right image)
So now we are over (or near) the line and we need to drag to channel 2 the first lap (SPEED_L1) of the speedometer just in that place, press the play button and carefully look the sync, we need to look just to the speedometer needle and the sound to get an idea if telemetry is going ahead or delayed, in some low-end computers the preview may not work smoothly and can be hard to sync due to slowdowns and freezes, we can solve this changing the image quality to "1/4" using the dropdown indicated in the image, if you still getting bad performance you can disconnect the image of the video onboard pressing the "eye" icon indicated in the very bottom of the image, this will boost the preview speed and will be enough to sync sound and telemetry
When you move the telemetry (purple bar in the image) a box appears showing how many frames you are moving forward or backward, anyway we will reach a point where we need to need more accuracy and make smaaaalll movements to synchronize perfectly both channales, to increase the accuracy and make smallest movements we should decrease the zoom bar at the very bottom of the image, in this animation example we can view how goes from 19 frames movements to 1 frame movement
Once we get audio and telemetry synchronized, we just need to pu the following giles one after the other, where finishes the first lap , beginns the second lap and so on, also we should to do the same process for the map (MAP_L1, MAP_L2...) so our timeline should look like that:
Note: it's possible that some lap remains not completely synchronized due some reasons like poor gps signal, video camera failure or frame drop, in another tutorial i wil try to explain how to solve this kind of mismatches
Obviusly we will not let the graphics in the center of the image, need to move and resize both, in this example i'm going to click over the purple bar SPEED_L9, at the left of the screen i get a set of controls that will affect to this clip, deploying the motion tab we access to the size and position settings, just have to put a number with the keyboard or modify with the mouse, pretty easy
Once we have the graphic in the right place, we press right click over motion tab and then Copy , then we will go clip to clip (SPEED_L1, SPEED_L2, SPEED_L3...) pasting the setting, that way all graphics we will be equal, to paste settings we need to right click at an empty zone and press Paste , the speedometer will take the posotion and the size right away
Last 2 steps are needed to the MAP graphic aswell (and also to a G-METER if we are using that graphic too) in the same line , we should to move the map to the desired position and size, copy settings and the paste to the others clips (MAP_L1,MAP_L2... )
To export the final edit we need to go to the Render Area
File -> Export -> Media
If target its Youtube, at format whe should choose H.264 and set the Preset to YouTube HD 1080p 29.97fps, this preset will ruin a lot the quality video but that it's the maximum quality that youtube accept at the moment, if you want to keep this video in your hard drive aswell i recommend you to make an aditional render with high quality settings like HD 1080 28.97fps preset